(Updated on Feb 03, 2018)
NOTE: This document has been updated. XML files are no longer in use and instead we have json files for map data.
Creating an isometric world with Traviso is pretty straightforward. Here is what u need:
- Visuals for tiles and objects.
- A JSON file for Traviso to know what goes where.
NOTE: Traviso is built on top of the pixi.js rendering engine. So if you haven’t already check it out here.
Creating a tile image
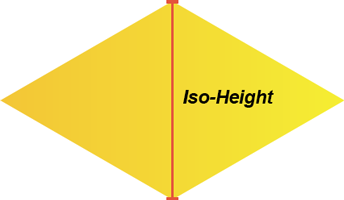
Isometric tiles are defined by two parameters throughout Traviso:
-
Iso-Height: The height of a single tile.
-
Iso-Angle: The angle between the isometric edge and the isometric (horizontal) diagnal of the tile.
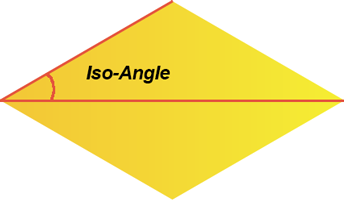
Default value for the Iso-Angle is 30 degrees and default height is 74 px.
Creating an object image
While creating your objects better use a tile image as a reference to decide where exactly your image sits on the tile.
Bottom corner of a tile is the reference point that traviso uses to align things inside the engine.
Just place your object-image on a tile-image, hide the tile-image, save it as the image file for your object.


Creating the data file
Data file is a simple JSON file which defines what goes where inside the engine.
Here is an example:
{
    "tiles": {
        "1":  {
            "movable": true,
            "path": "grassTile.png"
        }
    },
    "objects": {
        "1": {
            "movable": false,
            "interactive": false,
            "rowSpan": 1,
            "columnSpan": 1,
            "visuals": {
                "idle": {
                    "frames": [
                        { "path": "house.png" }
                    ]
                }
            }
        }
    },
    "groundMap": [
        { "row": "1 ,1 ,1 ,1" },
        { "row": "1 ,0 ,0 ,1" },
        { "row": "1 ,0 ,0 ,1" },
        { "row": "1 ,1 ,1 ,1" }
    ],
    "objectsMap": [
        { "row": "0 ,0 ,0 ,0" },
        { "row": "0 ,1 ,0 ,0" },
        { "row": "0 ,0 ,1 ,0" },
        { "row": "0 ,0 ,0 ,0" }
    ]
}
For a detailed explanation of the data file structure you can have a look at the related tutorial here.
Ready to roll
So here is the code piece to initialise traviso:
<script src="js/pixi.dev.js"></script>
<script src="js/traviso.dev.js"></script>

<script>

    ////// Here, we initialize the pixi application
    var pixiRoot = new PIXI.Application(800, 600, { backgroundColor : 0x6BACDE });

    // add the renderer view element to the DOM
    document.body.appendChild(pixiRoot.view);

    ////// Here, we create our traviso instance and add on top of pixi

    // engine-instance configuration object
    var instanceConfig = {
        mapDataPath: "mapData.json", // the path to the json file that defines map data, required
        assetsToLoad: ["grassTile.png", "house.png"] // array of paths to the assets that are desired to be loaded by traviso, no need to use if assets are already loaded to PIXI cache, default null
    };

    var engine = TRAVISO.getEngineInstance(instanceConfig);
    pixiRoot.stage.addChild(engine);

</script>
Traviso aims to give you a lot of flexibility in terms of customisation. What you see above is the minimum and default settings. For a list of customisation items go ahead and read the related tutorial here.
Download traviso and start playing around with the examples included.
Check out the documentation here.